How to Restore the Natural Beauty of Oak, Walnut, and More: A Step-by-Step Guide for Wooden Worktops
Your wooden worktops are more than just functional surfaces; they are the heart of your kitchen, adding warmth and character to your home. However, daily use can take a toll on their natural beauty, leaving them in need of a little TLC. Whether your counters are crafted from rich Oak, elegant Walnut, or exotic Iroko, restoring their luster is easier than you might think. This guide will walk you through the essential steps to bring back the charm of your wooden worktops, from gentle sanding to expert oiling techniques. Join us as we explore how to transform your kitchen worktops into stunning showpieces, ensuring they remain a testament to timeless elegance for years to come. For more detailed information on oiling techniques, check out this comprehensive guide on how to oil your worktops.
Preparing Your Wooden Worktops
Before diving into the restoration process, it’s crucial to understand the benefits, gather the right tools, and take necessary safety precautions. This section will guide you through the initial steps to ensure a successful wooden worktop revival.
Benefits of Restoring Wood
Restoring wooden worktops offers numerous advantages that go beyond mere aesthetics. By revitalizing your kitchen surfaces, you’re not just improving their appearance but also extending their lifespan and functionality.
Enhanced durability is a key benefit of restoration. Regular maintenance helps protect the wood from wear and tear, making it more resistant to scratches, stains, and moisture damage.
Improved hygiene is another crucial advantage. A well-maintained wooden surface is less likely to harbor bacteria, making your kitchen a healthier environment for food preparation.
Lastly, restoring your worktops can significantly increase your property’s value. Well-maintained wooden surfaces are highly sought after in the real estate market, potentially boosting your home’s overall appeal and worth.
Essential Tools and Materials
To effectively restore your wooden worktops, you’ll need a specific set of tools and materials. Having these on hand will ensure a smooth and efficient restoration process.
- Sandpaper (various grits)
- Wood oil or sealant
- Clean cloths or rags
- Protective gloves and goggles
- Dust mask
- Wood cleaner or mild soap
For sanding, a professional sanding service can provide optimal results if you’re unsure about tackling this step yourself.
Remember, the quality of your tools and materials can significantly impact the final result. Invest in reputable brands for the best outcome.
Safety Precautions to Consider
When restoring wooden worktops, safety should be your top priority. Taking the right precautions can prevent accidents and ensure a healthy working environment.
Ventilation is crucial. Always work in a well-ventilated area to avoid inhaling wood dust or chemical fumes. If possible, open windows or use fans to improve air circulation.
Protective gear is non-negotiable. Wear safety goggles to shield your eyes from dust and debris, and use a dust mask to prevent inhalation of fine particles. Don’t forget to protect your hands with appropriate gloves.
Lastly, be mindful of fire hazards. Some wood oils and finishes are flammable, so avoid open flames and ensure proper storage of these materials. Always read and follow the manufacturer’s safety instructions for all products used in the restoration process.
Cleaning Techniques for All Wood Types
Before any restoration work begins, thorough cleaning is essential. This section will cover effective methods for removing stains and deep cleaning various wood types, ensuring your worktops are primed for the next steps in the restoration process.
Removing Stains and Debris
Tackling stains and debris is the first step in revitalizing your wooden worktops. Different types of stains require specific approaches to ensure effective removal without damaging the wood.
For water stains, a mixture of equal parts white vinegar and olive oil can work wonders. Apply the solution to the stain, let it sit for a few hours, then wipe clean with a soft cloth.
Grease stains often respond well to a paste made from baking soda and water. Gently rub the paste onto the stain, let it sit for 15 minutes, then wipe away with a damp cloth.
For stubborn stains, consider using a specialized wood cleaner. Always test any cleaning solution on an inconspicuous area first to ensure it doesn’t discolour or damage the wood. Worktop Express offers a detailed guide on cleaning and maintaining wooden worktops.
Deep Cleaning Methods
After addressing specific stains, a thorough deep clean will prepare your worktop for the next stages of restoration. The method you choose depends on the type of wood and its current condition.
For general cleaning, a mixture of warm water and mild dish soap is often sufficient. Avoid soaking the wood; instead, use a damp cloth to gently clean the surface, following the grain of the wood.
For tougher grime, a solution of warm water and white vinegar (1:1 ratio) can be effective. Apply with a soft cloth, rinse with clean water, and dry immediately to prevent water damage.
In cases of severe build-up, a commercial wood cleaner may be necessary. Always choose a product suitable for your specific wood type and follow the manufacturer’s instructions carefully. Remember, the goal is to clean without stripping away the wood’s natural oils.
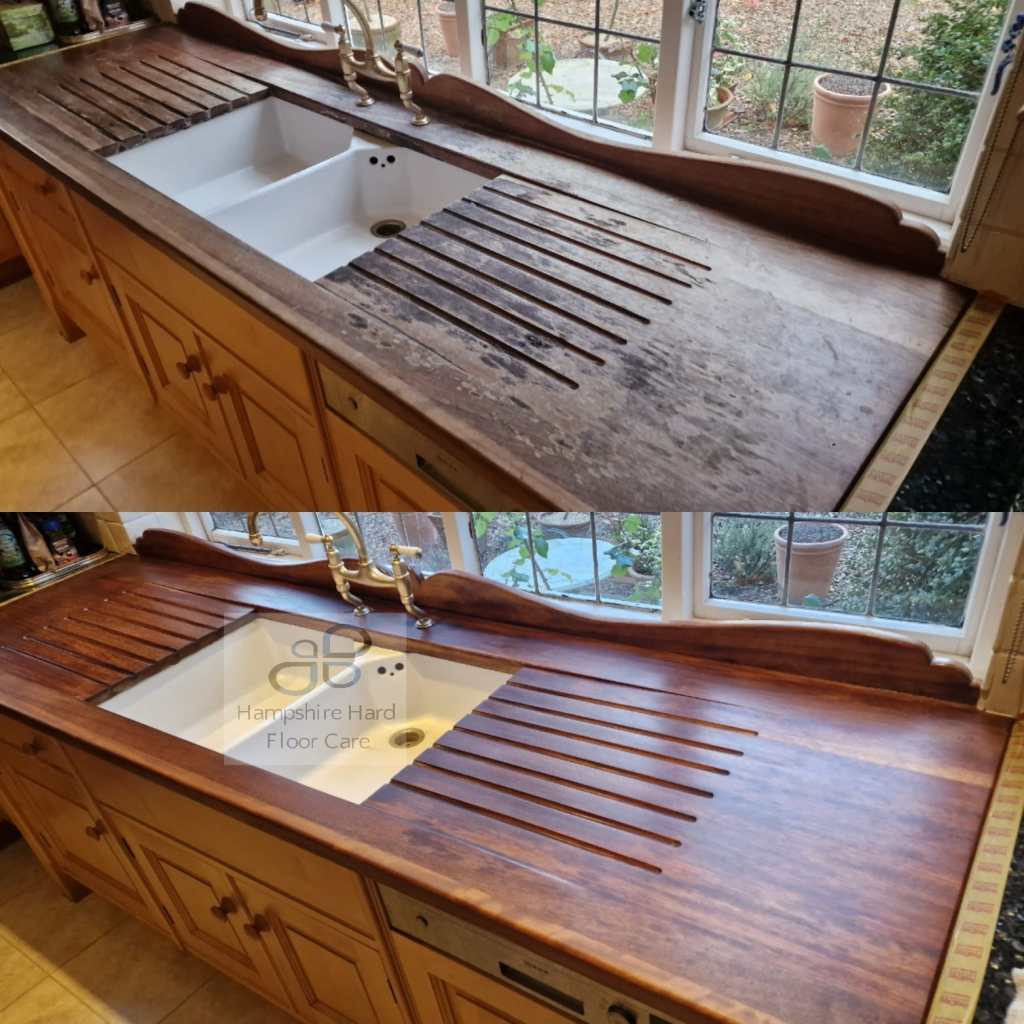
Sanding Your Wooden Surfaces
Sanding is a crucial step in restoring wooden worktops, removing surface imperfections and preparing the wood for new finishes. This section will guide you through choosing the right sandpaper and techniques for different wood types.
Choosing the Right Sandpaper
Selecting the appropriate sandpaper is essential for achieving the best results when sanding your wooden worktops. The right grit can make the difference between a smooth finish and a damaged surface.
Start with a coarser grit (60-80) for initial sanding, especially if your worktop has deep scratches or uneven areas. This helps to level the surface quickly.
Progress to medium grits (100-150) to smooth out any remaining roughness and prepare the surface for finer sanding.
Finish with fine grits (180-220) to achieve a smooth surface ready for oiling or sealing. For extremely smooth finishes, you might even go up to 320 grit.
Remember, the type of wood can influence your choice. Harder woods like Oak or Walnut may require starting with a coarser grit, while softer woods like Pine might need a gentler approach.
Sanding Techniques for Different Woods
Different wood types require specific sanding techniques to achieve the best results. Understanding these nuances can help you restore your worktops effectively.
For Oak and other hardwoods, start with a coarser grit and apply firm, even pressure. Move the sandpaper in the direction of the grain to avoid scratches. Gradually progress to finer grits for a smooth finish.
Softer woods like Pine require a gentler touch. Start with a medium grit and use light pressure to avoid creating dents or uneven areas. Be extra careful around knots, which can be harder than the surrounding wood.
For exotic woods like Iroko or Teak, their natural oils can clog sandpaper quickly. Change your sandpaper more frequently and consider using a sanding block for more even pressure distribution.
Hampshire Hard Floor Care offers professional sanding services if you’re unsure about tackling this step yourself, especially for large or particularly valuable worktops.
Oiling and Sealing Worktops
After sanding, applying the right oil or sealant is crucial for protecting your wooden worktops and enhancing their natural beauty. This section will cover the best products and techniques for different wood types.
Best Oils for Oak and Walnut
Choosing the right oil for Oak and Walnut worktops is essential for bringing out their rich colour and grain patterns while providing long-lasting protection.
Danish oil is a popular choice for both Oak and Walnut. It penetrates deep into the wood, enhancing its natural beauty and providing a durable, water-resistant finish. Apply in thin coats, allowing each to dry completely before the next application.
Tung oil is another excellent option, particularly for Walnut. It offers superior water resistance and durability, although it may require more coats and longer drying times between applications.
For a food-safe option, consider mineral oil. While it requires more frequent reapplication, it’s completely safe for food preparation surfaces and brings out the wood’s natural luster. Better Kitchens provides a comprehensive guide on oiling techniques for various wood types.
Applying Finishes to Iroko and Teak
Iroko and Teak are exotic woods known for their natural oils and durability. Applying the right finish can enhance these properties while protecting the wood from wear and tear.
For Iroko, a hardwax oil is often the best choice. It combines the penetrating properties of oil with the protective qualities of wax, resulting in a durable, water-resistant finish. Apply in thin layers, buffing between coats for the best results.
Teak oil is specifically formulated for Teak and similar exotic woods. It nourishes the wood while providing UV protection, which is particularly important for these sun-sensitive species. Apply generously, allowing the wood to absorb the oil fully before wiping away any excess.
Both woods benefit from regular maintenance. A light sanding and reapplication of oil every 6-12 months can keep your worktops looking their best. For detailed instructions on oiling techniques, check out this guide from Woodworktops.
Maintaining Your Restored Worktops
Regular maintenance is key to preserving the beauty and longevity of your restored wooden worktops. This section will provide tips for ongoing care, focusing on specific wood types and long-term protection strategies.
Regular Care Tips for Mahogany and Ash
Mahogany and Ash worktops require specific care routines to maintain their unique characteristics and ensure long-lasting beauty.
For Mahogany, regular dusting and cleaning with a slightly damp cloth is essential. Avoid harsh chemicals that can strip the wood’s natural oils. Instead, use a mild soap solution when necessary, and dry immediately to prevent water damage.
Ash worktops benefit from frequent oiling to maintain their light colour and prevent drying out. Apply a thin coat of food-safe oil every 4-6 weeks, or more often in high-use areas.
Both wood types should be protected from direct sunlight and extreme temperature changes. Use coasters for hot dishes and wipe up spills immediately to prevent staining. Priory Polishes offers excellent advice on maintaining different wood types through regular oiling.
Long-term Protection for Sapele and Maple
Sapele and Maple worktops require specific long-term care strategies to preserve their unique qualities and extend their lifespan.
For Sapele, which is similar to Mahogany, regular oiling is crucial. Use a high-quality, food-safe oil every 6-8 weeks to maintain its rich, reddish-brown colour and protect against moisture damage. Be sure to apply the oil in the direction of the grain for optimal absorption.
Maple worktops, known for their light colour and smooth texture, benefit from a combination of oiling and waxing. Apply a food-safe oil monthly, followed by a thin layer of beeswax every 3-4 months for added protection against stains and scratches.
Both woods should be protected from excessive moisture and heat. Use trivets for hot pots and pans, and avoid leaving standing water on the surface. Regular cleaning with a mild soap solution and immediate drying will help prevent damage over time.
For more detailed guidance on long-term wood care, including specific product recommendations, check out this comprehensive guide from Rawlins Paints. Additionally, Norfolk Oak provides excellent aftercare advice for maintaining various types of wooden worktops.

Leave a comment