Transforming your home into a cosy, energy-efficient haven has never been easier, and loft insulation is a fantastic starting point. As energy costs continue to rise, many UK homeowners are exploring DIY options to improve their property’s insulation, making their homes not only warmer but also more budget-friendly. With expert tips and guidance, you can confidently tackle this project, turning it into a rewarding experience that adds value to your home. Whether you’re a seasoned DIY enthusiast or a beginner looking to make a change, our step-by-step advice will ensure a smooth and successful installation. Ready to start saving on your energy bills and enjoy a more comfortable living environment? Let’s dive into the world of loft insulation and discover the benefits it can bring to your home. For more detailed information on how to install loft insulation, check out this comprehensive guide.
Benefits of Loft Insulation
Loft insulation is a game-changer for UK homeowners, offering a range of advantages that go beyond just keeping your home warm. Let’s explore the key benefits that make this home improvement project a smart investment.
Save on Energy Bills
Installing loft insulation can significantly reduce your energy consumption and, consequently, your utility bills. By creating a thermal barrier, insulation prevents heat from escaping through your roof, which is where up to 25% of a home’s heat loss occurs.
The Energy Saving Trust estimates that properly installed loft insulation can save you up to £315 per year on your energy bills. This means the initial investment in insulation materials and installation often pays for itself within just a few years.
Over time, these savings add up, making loft insulation one of the most cost-effective home improvements you can make. It’s an investment that continues to deliver returns year after year, especially as energy prices continue to rise.
Improve Home Comfort
Loft insulation doesn’t just save you money; it also enhances the overall comfort of your living space. By maintaining a consistent temperature throughout your home, insulation creates a more pleasant environment year-round.
In winter, loft insulation keeps the warm air inside, reducing cold spots and drafts. This means you can enjoy a cosy home without constantly adjusting your thermostat or piling on extra layers of clothing.
During summer months, insulation works in reverse, keeping the heat out and your home cooler. This dual-season benefit ensures that your living spaces remain comfortable regardless of the weather outside, creating a more enjoyable home environment for you and your family.
Boost Property Value
Investing in loft insulation can increase your property’s value and appeal to potential buyers. Energy efficiency is becoming increasingly important to homebuyers, and a well-insulated loft is a significant selling point.
According to property experts, homes with good insulation and energy-efficient features can command higher prices in the market. Potential buyers are often willing to pay a premium for properties that promise lower energy bills and a smaller carbon footprint.
Moreover, a properly insulated loft can improve your home’s Energy Performance Certificate (EPC) rating. A higher EPC rating not only makes your property more attractive to buyers but can also potentially increase its value by up to 14%, according to some estimates.
Choosing the Right Insulation
Selecting the appropriate insulation for your loft is crucial for maximizing energy efficiency and comfort. Let’s explore the factors to consider when making this important decision.
Types of Insulation Materials
When it comes to loft insulation, there are several materials to choose from, each with its own set of advantages. The most common types include:
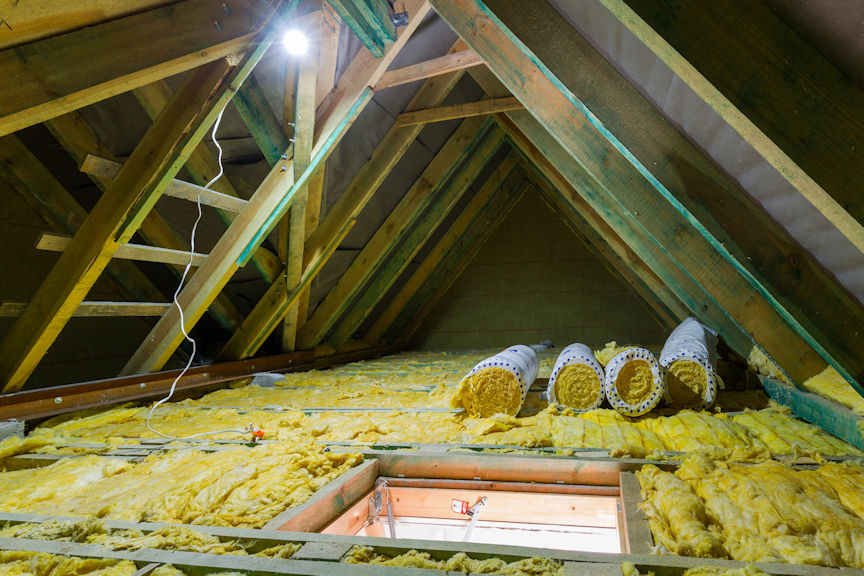
- Blanket insulation: This is the most popular and easiest to install. It comes in rolls of rock, glass, or mineral fibre and is ideal for lofts with regular joist spacing and easy access.
- Loose-fill insulation: Made from recycled materials like cellulose or mineral wool, this type is blown into place and is perfect for irregularly shaped lofts or those with limited access.
- Sheet insulation: Typically made of rigid foam boards, this type is excellent for lofts with limited space or those being converted into living areas.
Each material has its pros and cons in terms of cost, performance, and ease of installation. For a detailed comparison of insulation types, check out this guide from SuperFoil.
Understanding R-Values
R-value is a measure of thermal resistance, indicating how well a material insulates. The higher the R-value, the better the insulation performance.
In the UK, the recommended R-value for loft insulation is around 6.7 m²K/W, which typically translates to a depth of 270-300mm for most insulation materials. However, this can vary depending on the specific product and your home’s requirements.
It’s important to note that R-values can decrease over time due to settling or compression. Therefore, it’s wise to choose a slightly higher R-value than the minimum recommended to ensure long-term effectiveness.
Eco-Friendly Options
For environmentally conscious homeowners, there are several eco-friendly insulation options available. These materials not only provide excellent insulation but also have a lower environmental impact:
- Sheep’s wool: A natural, renewable resource that’s biodegradable and has excellent insulating properties.
- Recycled plastic bottles: Transformed into polyester insulation, this option gives new life to plastic waste.
- Cellulose: Made from recycled newspapers and treated with fire retardants, this is an effective and sustainable choice.
These eco-friendly options often have additional benefits, such as being non-toxic and having sound-absorbing qualities. While they may be slightly more expensive upfront, they offer long-term environmental benefits and can contribute to a healthier home environment.
DIY Installation Tips
Installing loft insulation can be a rewarding DIY project for many homeowners. With the right preparation and tools, you can significantly improve your home’s energy efficiency. Let’s break down the process into manageable steps.
Preparing Your Loft
Before you begin the installation process, it’s crucial to prepare your loft properly. This preparation ensures a smooth installation and maximizes the effectiveness of your insulation.
Start by clearing out your loft space, removing any stored items, and ensuring you have a clean, dry surface to work with. Check for any signs of damp or leaks in the roof and address these issues before proceeding.
Next, ensure proper ventilation. Good airflow is essential to prevent moisture build-up, which can lead to mould and reduce insulation effectiveness. Install roof vents if necessary, and make sure any existing vents are not blocked.
For more detailed preparation tips, check out this helpful Reddit thread where DIY enthusiasts share their experiences and advice.
Essential Tools and Materials
To successfully install loft insulation, you’ll need the following tools and materials:
- Insulation material (rolls or batts)
- Tape measure
- Utility knife
- Straight edge for cutting
- Protective gear (gloves, dust mask, safety goggles)
- Boards to lay across joists for walking
- Adequate lighting (headlamp or portable work light)
For loose-fill insulation, you may need to rent a blowing machine. If you’re installing reflective foil insulation, you’ll also need a staple gun and foil tape.
Remember, safety should always be your top priority. Ensure you have all necessary protective gear before starting the project.
Step-by-Step Guide
Follow these steps to install your loft insulation:
- Measure the area to determine how much insulation you need.
- If using blanket insulation, start at the eaves and work your way towards the centre of the loft.
- Lay the insulation between the joists, ensuring it fits snugly without being compressed.
- Add a second layer perpendicular to the first for optimal coverage.
- Don’t forget to insulate the loft hatch and any water tanks or pipes in the loft space.
For a more detailed walkthrough, including tips for different types of insulation, check out this comprehensive DIY loft insulation guide from the Centre for Sustainable Energy.
Remember, if you’re unsure about any aspect of the installation process, it’s always best to consult a professional. Proper installation is key to maximizing the benefits of your loft insulation.
Safety and Regulations
When undertaking a loft insulation project, it’s crucial to prioritize safety and adhere to relevant regulations. This ensures not only your well-being but also the legality and effectiveness of your installation.
Health Precautions
Installing loft insulation can pose certain health risks if proper precautions aren’t taken. Here are some essential safety measures to consider:
Wear appropriate protective gear, including a dust mask, safety goggles, and gloves. This protects you from inhaling fibres and irritants that can cause respiratory issues or skin irritation.
Ensure proper ventilation in the loft space during and after installation. Good airflow helps prevent the build-up of harmful particles and reduces the risk of overheating while working.
Be mindful of electrical wiring in the loft. If you encounter any exposed wires or damaged electrical components, stop work immediately and consult a qualified electrician.
For more detailed safety advice, check out this informative guide on loft insulation installation which covers key health and safety considerations.
Building Regulations Compliance
In the UK, loft insulation installation must comply with building regulations to ensure energy efficiency and safety standards are met. Key points to remember include:
- The minimum required depth for loft insulation is 270mm for glass wool, 250mm for rock wool, or 220mm for cellulose fibre.
- Insulation must be installed with minimal gaps to prevent heat loss.
- Proper ventilation must be maintained to prevent condensation and mould growth.
It’s advisable to consult the government’s planning portal for the most up-to-date regulations. If you’re unsure about compliance, consider hiring a professional installer who is familiar with current building standards.
Warranty and Insurance Considerations
Proper installation of loft insulation can affect both your home warranty and insurance coverage. Here are some key points to keep in mind:
Many insulation products come with manufacturer warranties, but these often require professional installation to remain valid. If you’re doing a DIY installation, check the warranty terms carefully.
Improper installation that leads to issues like moisture damage or mould growth could potentially void your home insurance policy. It’s crucial to inform your insurer about significant home improvements like loft insulation.
If you’re considering hiring a professional, look for installers who offer workmanship guarantees. This provides an extra layer of protection and peace of mind.
For more insights on DIY versus professional installation, including warranty and insurance implications, check out this Reddit discussion where homeowners share their experiences and advice.
Hiring Professional Services
While DIY installation is possible, many homeowners prefer to hire professionals for loft insulation. This ensures expert installation and compliance with regulations. Let’s explore how to find and work with professional installers.
Finding Qualified Installers
Locating a reputable insulation installer is crucial for a successful project. Here are some steps to find qualified professionals:
- Check for certifications: Look for installers certified by recognized bodies like the National Insulation Association (NIA) or the Insulation Assurance Authority (IAA).
- Read reviews and ask for references: Online reviews and personal recommendations can provide valuable insights into an installer’s reliability and quality of work.
- Verify insurance: Ensure the installer has proper liability insurance and worker’s compensation coverage.
For a list of accredited installers in your area, you can visit the Energy Saving Trust’s website, which provides a directory of certified professionals.
Questions to Ask Your Contractor
Before hiring an installer, it’s important to ask the right questions to ensure they’re the best fit for your project. Consider asking:
- What type of insulation do you recommend for my loft, and why?
- How long will the installation take?
- Will you handle any necessary preparations, such as clearing the loft or improving ventilation?
- Do you provide a warranty on both materials and workmanship?
- Can you provide a detailed, written quote?
These questions will help you gauge the installer’s expertise and ensure you’re both on the same page regarding the project scope and expectations.
Comparing Quotes and Services
When you’ve shortlisted potential installers, it’s time to compare their quotes and services. Here’s what to consider:
- Don’t automatically go for the cheapest option. Compare the quality of materials, extent of services, and warranty offered.
- Look for transparency in pricing. The quote should break down costs for materials, labour, and any additional services.
- Check if the quote includes post-installation clean-up and disposal of old materials.
Remember, a slightly higher upfront cost might lead to better long-term savings if it means superior insulation quality and installation.
For more tips on choosing and working with professional installers, check out this comprehensive guide on loft insulation installation. It provides valuable insights into the professional installation process and what to expect.

Leave a comment